Saturday, May 18, 2024

A Head Of The Pack: Basic Guidelines For Sculpting The Equine Head


Introduction

The head is probably one of the most difficult things to sculpt when it comes to horses. You gotta admit, its many planes, angles, symmetries, and skeletal and fleshy structures offer a continual challenge to even the most seasoned sculptor. Indeed, there's a lot going on in a relatively small space! That being the case, we can get confused and go off track even with the most painstaking diligence or even worse, become quickly overwhelmed and frustrated. And as humans who are visually oriented and sensitive to facial cues, we naturally zero in on the head immediately. If something is off then, that error can become rather distracting and compromise what else we’ve gotten right. Luckily though there are some basic measurements we can use as guides, as neutral baselines we can use to sculpt any equine head with relative ease. And by providing a straightforwards architecture, a framework that directs our sculpting, we gain more clarity and direction in what we’re doing. Even better, these baselines are universal regardless of the breed, species, expression, or individual and so we can apply them across the board to express any characteristic or eccentricity we wish.


Simply put then, I use eleven basic guidelines for sculpting any equine head. Just remember though that these guidelines should be used as a starting point from which to build those unique features your piece needs. In other words, think of these as starter guidelines you’ll need to tweak as needed, they aren’t dogma. But we have to start somewhere, right? Now to big picture it all, the most important measurement is the total head length, from the back of the ears at the poll to the end of the (un-pooky) upper lip. It’s from this measurement that most of the others derive, which can be broken down into one–half, one–third, and one–fourth increments for the most part. From those we can finagle our way to greater precision because they give us a consistent place to start. So what are these basic guidelines? Well, let’s just jump right in!…


Get In Line


The Ears–Eye–Nostril Alignment (EENA) is a fundamental, very important guideline and lucky for us, it’s easily gauged with a straight edge like a pencil, ruler, a paintbrush, or the long side of calipers. Why is it so important? Well, for one it establishes the length of the head from which we derive a lot of our other guidelines. And for another, it helps us to place our ears, eyes, and nostrils. And lastly, it determines the axis of the head whether straight, convex, or concave. So going from the bottom of the ear bulb, under the bottom of the eye and then to the bottom of the nostril, we can see how they tend to line up. However, keep in mind that the illustration is of a straight head, which is why they line up. For instance, many Thoroughbreds, Warmbloods, Saddlebreds, Mustangs…many horses…have a more or less straight alignment to the EENA, or a straight head. There’s a bit of variation, of course, but for the most part, many horses line up to a straight EENA pretty well. In contrast, sometimes this axis can be bent upwards, or convex, with the nostril dipping below the line a bit as can may see with breeds with a convex profile such as many Iberians, Campolinas, Kladrubers, some drafters and such. In contrast, sometimes this axis can be bent downward, or concave, with the eye lying just below this line. This kind of head can sometimes be seen with some Arabians, in particular, or other “dishy” heads. But this is why carving in a dish or simply adding a roman nose often doesn’t always create such a convincing head type because we aren’t addressing the actual axis of the skull. 


What’s more, notice that the teardrop bone (or facial crest) somewhat parallels the EENA, too, a handy observation for shaping our head. The line of the mouth can as well at times. Regardless, use the EENA to study lots of different heads to get an idea of all the consistencies as well as all the variety and options involved — there’s a lot!


Three Times The Charm
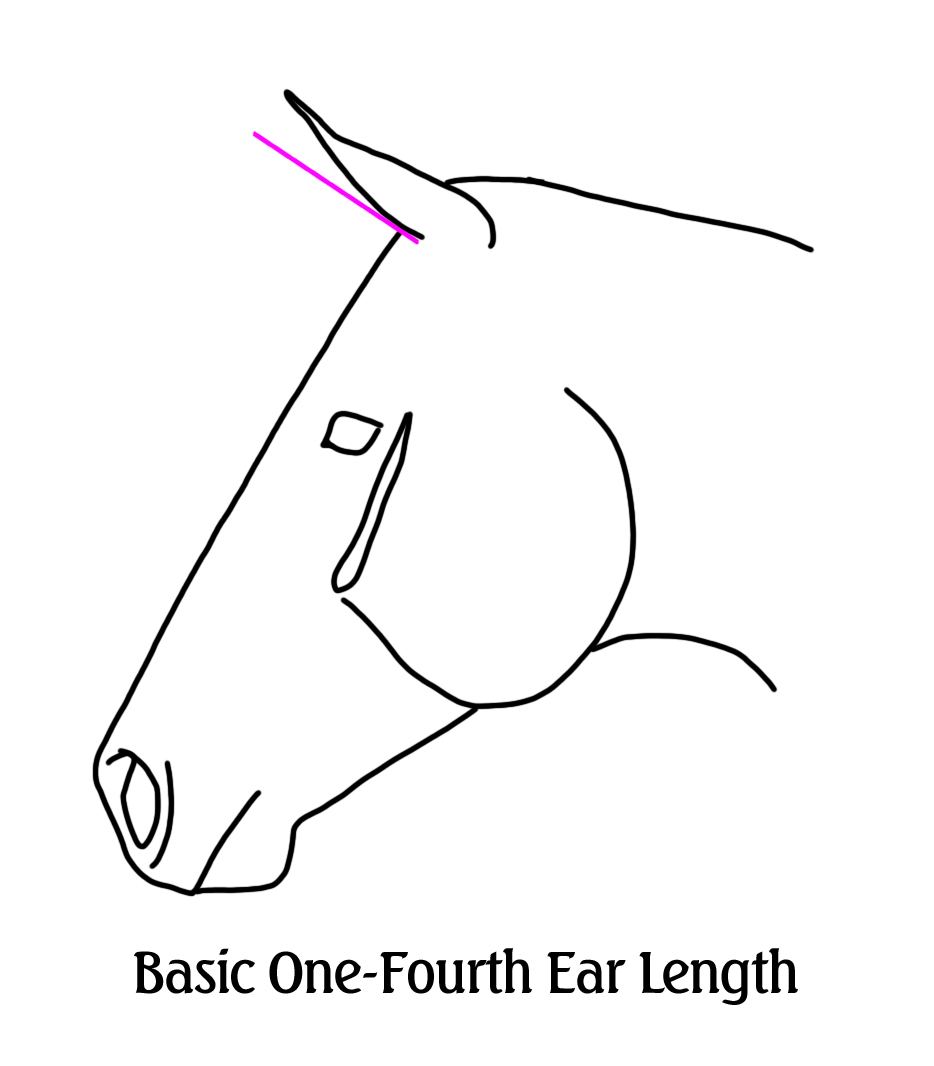

Generally speaking, the horse’s head can be broken into thirds, from the ear “V” to the front canthi of the eye then from that point to mid-cheek and from that point to the end of the upper lip or thereabouts. 

This measurement tends to be more or less consistent among heads though deviations between individuals, breeds, and species occur, of course. When they do deviate, however, it tends to be in the length of the face rather than the distance from the eye from the ear but here again, there's variation, too.

That’s Deep, Man

As for the depth of jowl, it’s often about one–half the length of the head from the forehead to the bottom of the jowl (when the mouth is closed). There’s variation, naturally, but this is a good place to start your adjustments.


Similarly, the depth of the muzzle varies quite a bit between breeds, individuals, and species, but a general baseline is that one–third length measurement we used previously. From that we can decrease or increase its depth as needed.

I’m All Ears


As for ears, they vary quite a bit between individuals, breeds, and species, even genders as mares tend to have longer and larger ears than stallions. Foals also tend to have relatively larger ears they haven’t quite “grown into” yet. Similarly, hemonids, asses, and equine hybrids have larger ears while zebras do as well, who may also have ears of a modified shape. On the other hand, some breed type standards require a certain small ear size such as Shetlands, Hackney ponies, and Dartmoors who are supposed to have tiny ears.


But a general place to start these explorations is this—many ears tend to be just about one–fourth the length of the head measured from the bottom “v” to the tip of the ear. From that, we can lengthen or shorten, or even enlarge them as needed.

Spread Out


Now determining the width of the head, the distance between the brows, can be quite tricky as it varies a lot between individuals, breeds, and species. For example, some Iberians, drafters, and Saddlebreds can be rather narrow whereas others like the Arabian, Morgan, and some ponies can be quite broad. Field study is your best bet here, taking actual measurements from lots of real horses to get a bubble of options. But you can also study lots of reference photos from different angles, especially from the front, though this is much trickier.


Even so, a good start is a measurement about one–third the length of the head, between the front canthi. Then we can make it narrower or wider as the sculpture requires.


As for the width of the jowls, that varies a lot, too, especially between breeds. For example, stock horses can have very wide, hefty jowls, even extending beyond the width of the teardrop bones. Nevertheless, we can start here as a baseline: The width of the jowls ballparks about one–half of the head length.


The width of the cheeks, the area between the jowls and muzzle, is often comparatively narrow, sometimes markedly so. So to get us started, think of this area as being between one-third to one–fourth the length of the head or thereabouts, adding or subtracting width as we need to for our sculpture.


The width of the muzzle can vary a lot as well, being quite broad or quite narrow, and everything in between. This is also where field study and references photos of a straight on front view are so useful. Nonetheless, we can think of the width of the muzzle as about one–fourth the length of the head, adding or subtracting width as needed for our piece.


Flare Up


Nostrils can be a tricky thing to sculpt owning to their fleshiness and pliability. They can certainly squinch to become narrow and pinched one moment to then become wide and cavernous the next. So here’s where field study and reference photos are particularly helpful, especially since all this needs to be synched to the level of exertion, the communication, or the mood depicted by our sculpture.


Even so, we can think of a resting nostril as a baseline and even though that varies between individuals, breeds, and species, we can make a couple of general starter observations. For one, the length of a typical nostril is about one-eighth the head length from the upper “V” to the bottom of the posterior rim at rest. On the other hand, when flared, that proportion will expand to open up the nostril to varying amounts. What’s more, certain breeds like Arabians and Thoroughbreds should have large standing nostrils as a point of type.


Mouthing Off


For a starting point, sometimes the angle of the mouth is rather parallel to the EENA, similar to the teardrop bone. Of course, there’s going to be variations, but again, this gives us a good place to start our investigations. As for length, we can think of the mouth as being about as long as where the chin connects to the lower jaw, give or take depending on the individual, breed, or species. In fact, some breeds ask for a longer mouth, such as the Arabian. 


As a general tendency, too, the front “corners” of the lower lip tend to protrude a bit past the front portion of the upper lip but the lower lip tends to be more depressed inwards at the corner of the mouth. This isn’t always the case, but we can use this tendency to find variations.


Bar None


The length of jaw bars from the intersection with the jowls to the edge of the chin varies a lot, but a good baseline is this can sometimes be just over one-third the head length. Study this a lot between individuals, breeds, and species to find all the fun options for your sculpture.


Wearing The Crown


The width between the ears, or the crown, also varies a lot between individuals, breeds, and species so study this a lot, too. Like generally speaking, Arabians and Morgans can be quite wide in the crown whereas Iberians, Saddlebreds, and some drafters can be relatively more narrow. As a basic measurement to make adjustments from though is that the crown can be somewhat one-third the head measurement from the bottom “v” fold of ear to ear.


Dem Peepers


One feature of the head that’s quite variable is the size of the eye — not the orb itself, but the eye as measured within the surrounding lids from the front canthi to the back canthi. So do a lot of study here to find your options. For instance, Arabians and many ponies tend to have bigger eyes than say drafters or Warmbloods due in part to the structure of the surrounding fleshy features and relative head size. As a general idea though, the typical eye is about one-twelfth the length of the head, give or take, so make your necessary determinations from that point. A common hiccup when sculpting the eye, as a function of artistic stylization, is to make the eyes way too big so this measurement can be really helpful to avoid this.


Spinnin’ Out


The canthi (the front and back corners of the eye) of the typical eye are angled to the EENA at about 40° - 42°. There’s individual, breed, and species variation, of course, but this is a good starting point to make your adjustments. 


Life study and references can provide a good mental library. But getting this angle is important because if the canthi are angled improperly, if they’re spun out of alignment, the head will look odd.


Ending Thoughts


See, once you have some basic guidelines, putting together the rest of the noggin isn’t so hard! The trick is just doing your homework ahead of time so you know how to tweak these measurements and alignments when it comes time to sculpt. Preparation is key! It’s also important to use these guidelines to study lots of individuals, breeds, and species so you can develop a solid mental library of the possible options. Honing our Eye will always serve us well. And just as much, regularly checking our work against these measurements as we sculpt will keep our work from going sideways which can happen if we lose sight of the big picture. And above all, practice practice practice! If you can draw, do lots of sketches. Do some quick maquette work in non-hardening clay like Sculpey or oil clay. Look at your sculpted head in a mirror to freshen your eye with a "reversed" view. Take pictures of your sculpture and check your work within the objectifying lens of the camera for another fresh eye, reversing it too in a photo editing program for another view. 


Every horse has a unique head, just like us. How cool is that? So many potential options! So as realistic equine artists, the better we can create a basic head and the better we can pinpoint where to tweak it for individual variation, the better and more varied our heads will turn out. Overall then, learn to apply these guidelines as standard operating procedure and pretty soon they’ll become second nature and you’ll find yourself not only having an easier time sculpting heads, but be better able to pinpoint what’s so wonderfully different between them all! What a great way to get ahead!


“This world is but a canvas to our imagination.”

— Henry David Thoreau


Share/Bookmark

Thursday, April 25, 2024

Flat Out Fun: Sculpting In Relief Part IX


Introduction

What a ride, huh? So many ups and downs and going sideways, but we’re almost finished! We now have a piece covered in squiggles and defining lines — have we ruined it? Nope! We have one more step to go then we’ll have our beautiful finished relief ready for casting. So lets get to it in this Part IX and finish this puppy up!


Final Finessing


So we did the rough-smoothing earlier, right? Well, now we have the final-smoothing to blend in and soften all the definitions and squiggles and whatnot we now have on our piece and to smooth those brushstrokes the rough-smoothing left. In short, a final clean up. To do this, we’re going to use our soft filberts and our Turpenoid/rubbing alcohol mix and instead of a scrubby motion, we’re going to use a smoothing softer brushing motion. Again, there’s a learning curve with this to learn the right pressure, but you’ll discover it quickly. And again, don’t soak the brush as you want just enough to lubricate it. Too much mix and you'll just end up making more brushstrokes so be miserly with it.


Now what’s great about this Turpenoid/rubbing alcohol mix is that it’s far less aggressive than GooGone and it evaporates quickly, but even so, don’t soak your piece with it. You don’t want mush, you just want a softening and blending of all the fiddly sculpting work you just did. So be gentle and finessed, don’t just brush it on. Be as fiddly with the brush now as you were with your tools. And don’t be afraid to go back in and re-fiddle and then resmooth with back and forth work. This is the time to get things just so. And don’t forget the edges. And check your piece under directional lighting, too, to make sure everything is exactly how you want it.


Here you can see Nashat being finessed with the final smoothing and what a difference it makes. 


You can see how far I go with that fiddling and how far I go with that final smoothing. Learning how to strategically amplify some features is a learned skill because not all features should be equally amplified. The living body is a spectrum of definition plus certain angles and poses will require different kinds of amplification of certain features. Remember always that sculpture is really about playing around with light and shadow so again, check your work under directional lighting to make sure your finessing is to your liking and accurate to your references.


And again, take your time with this final-smoothing step — don’t rush it. This is where your clay really comes alive and things blend together in the most lovely fleshy and cohesive way. It’s so amazing to see your piece materialize so beautifully right in front of you, like magic! So savor this step and Groove your way through it because this is where all that magical stuff happens.


So after you’ve gone over the entire piece and got things exactly as you like them…guess what? You’re done! Bingo! Ta-da and huzzah! You did it! Isn’t your relief beautiful and cool?! Fantastic job! Now your oil master is ready for waste casting to produce a hard resin copy you can further detail out and clean up to ready for production, but that’s another blog topic. However, if you’ve really finessed your oil master and got your signature on it already, it might be able to go straight into production with an immediate production mold. However, I like to play around with a hard resin copy to get everything just so, but that’s just me. Another benefit about producing a waste mold first though is discovering where the mold will catch and tear when your piece is pulled, allowing you to fix that in the resin master so the production mold will pull properly.


Further Concerns


So when to call done? When is done actually done? That’s entirely up to you. Oil clay will let you work for a very long time, but not indefinitely — it does have a life span. Within that lifetime though, you have a lot of time to play around with your piece. The way I call done then is when I can’t go any further on the piece…there’s literally nothing more I want to do to it. I’ve gone as far as I can go. When I’ve hit that mark, I know the piece is fully done. Such satisfaction!


But before you call done, take a picture of it with your phone, look at it through the objectifying lens for a fresh look. Pop that photo into a photo editing program to see it big and up close if you need to. Flip it horizontally to see it from a whole new perspective. Inspect your piece upside down, too. And look at it in a mirror, reversed. Do all these things and you’ll see trouble spots pop out that need your attention — attend to them. When the piece looks right to you after all of this, chances are it’s truly done. And it’s important to call done! Finishing what you start and moving onto the next piece is far more critical to developing your skillset than you may realize. You need the experience of lots of different pieces under your belt to really improve since one piece only has so much to teach you. You need many teachers and each piece is a new teacher. And it’s nice to close that chapter of your journey to open a new blank page for the next piece. So call done and move on. 


Remember you always have to sign your work! If you can date it too, that’s great if space allows. But always sign it with your signature or name or studio logo — something. You can do this now in the clay if you wish but unless you sign the front of it, you often you can’t get good access to a suitable edge for a hidden signing. So what I typically do is sign and date the waste casting I get back from the caster when I can manhandle the hard piece as a resin cast. I just dremel out a scoop along the edge, wash it out with rubbing alcohol, then squish in some epoxy clay. Then I wait for that to stiffen just a little bit then stamp in my logo and carve my signature and date into that, let it cure, then sand it down smooth with the rest of the edge. Then I go on to clean and detail out the waste casting then spray it with primer, and done….ready for production. Phew!


Trouble Shooting


If an area becomes to gooey and soaked, let it rest for a couple of hours and then come back to it. Sometimes it has to sit overnight if it’s really bad. If it’s been way way way soaked, you may have to scoop it out and lay down fresh clay and start that area over again. It’s really important not to soak your clay with solvent! Remember, just enough to lubricate and blend.


If you end up erasing too much of your finesses by too-aggressive brush work, no problem! Just go back in and re-finnese and re-brush, more gently this time. Oil clay will let you do as much back and forth work as you need given you don’t soak the clay with solvent.


Do you see an area you’ve ended up not liking? No big whoop! Go back in with your tools and clay to resculpt it and use your soft filberts and Turpenoid/rubbing alcohol mix to smooth it down, re-finesse, and re-smooth, repeating the steps. You can just skip the GooGone in this situation if the area isn’t too big. Now if it’s something as major as adding an entirely new head, you’ll have to repeat the entire process from the ground up, but that’s okay — everything will blend together in the end.


Conclusion


It’s been quite the creative safari, hasn’t it? A whopping nine-part series and you made it! What a relief! (grin) You tackled so much and triumphed! You problem solved your way through this puppy with beautiful results! Go, you! See, sculpting a relief wasn’t so hard, was it? And just keep at it as it gets easier and faster the more reliefs you sculpt. And the more experience you get, the bolder your compositions will become and that’s exciting stuff right there!


Remember, too, that this is how I sculpt relief work — take from it what you will and dump the rest that doesn’t work for you. Make your process your own to fit your needs and preferences. And have fun! Sculpting a relief should be a joyful, exciting, and fascinating experience, not a trial. If it starts to become too much for you, stop, walk away, and let it percolate so your subroutines have time to catch up. It’s amazing what some time away can do to not only freshen your Eye but also your skills and motivation.


All in all, sculpting relief work is a great way to learn sculpting techniques, tool work, and discovering which clays you like best. It’s also a fantastic way to learn about anatomy, conformation, and type in a relatively fast way. It’s also a terrific teacher of composition and design, of engineering and casting concerns, things you’re going to learn really fast the more reliefs you sculpt. So if you want to learn about sculpting in relatively short order, I highly recommend starting with relief work. It’s an incredible teacher, a great creative adventure, relatively easy and quick, and a source of never-ending fascination and innovation. Just dive in and join the flat out fun!  


“Life beats down and crushes the soul and art reminds you that you have one.”

- Stella Adler

Share/Bookmark

Wednesday, April 24, 2024

Flat Out Fun: Sculpting In Relief Part VIII


Introduction

Welcome back to this nine-part series exploring how I sculpt a relief. I use the same methods and materials for every relief piece I sculpt and hopefully you’ll find some of what I share helpful for your own work. So in Part VII, we rough-smoothed our relief so where do we go from here? Let’s find out!…


Fussing, Futzing, and Fiddling — The Fun Part


So let your piece rest from the GooGone for about an hour or two then now is the time to go back in with your tools to create detail, fleshy textures, and to define and refine stuff. Don’t use any solvents at this step, just your tools. And you can get as fussy as you want to work in as much detail and stuff as your references indicate. And don’t be timid, really get in there. At the same time though, don’t go too crazy. Again, there’s a Goldilock’s Zone with pressure and harshness that details and defines without being too aggressive. But even if you do unintentionally get too crazy with something, that’s okay. You can futz with it again and again when we smooth over it. But learning that Goldilock’s Zone sooner rather than later is useful to avoid this extra work later on.


So here on Meddur you can see what I mean and how bold you can get with all this fussy stuff. So in your references look for things like wrinkling, bumps, crinkling, stretches, and other fleshy textures and striations, inputting what you See into your clay best you can. Here chaos is your friend, or rather the “organic chaos” of fleshiness so try not to sculpt in a regimented way but try to be as random and organic as possible with your tool strokes. This stage is all by feel, by the way. You can do as much or as little as you want to do, it’s your preference. As for the mane, tail, or feathers you can go over those areas with delicate striations to define and refine the hair as you wish, which is what I’ve done here with Meddur (I also did the same with Nashat, but forgot to snap a photo of his striations "in the raw").


And again, trust the process! Yes, you’re carving up your nicely smoothed areas, but there’s a method to the madness here — it’ll all make sense in the end. And on a personal note, I find this fussy stage to be so satisfying. You really start to see your piece come alive and come together, and it’s also quite meditative to boot. So have some fun with it and take your time. Definitely don’t rush this step, really finesse that fiddling and get lost in the Groove.


Trouble Shooting


If you’ve goofed up, no big whoop. Just add more clay if needed, resculpt, resmooth, and then try again. Oil clay gives you many times to get it right.


If your grooves and definitions and whatnot are too aggressive, that’s okay. You can tame them down with your tools with some tinkering plus we have one more round of smoothing that’ll make short order of that.


Unless it’s your style, try to avoid defining the muscles like an anatomy chart with a neat formulaic approach. Living flesh really looks quite different than an anatomy diagram. (I recommend my 2011 posts, Now About Those Anatomy Charts Parts I and II.) Really study your references to see where hints at muscles are more effective and realistic and where sharply defining your muscles is called for…the living body is a mix of those two and everything in between, a spectrum of fleshy expression.


Keep your tools and your relief cleaned of pilled clay bits and other relics generated by this stage. Just use your tool to carefully remove them and wipe them on a shop towel. I clean my tool often, for instance, often between each tool stroke if clay builds up on it.


Conclusion to Part VIII


Believe it or not, we’re almost done! It’s been quite the creative adventure so far but we’re coming to the end of it. What could possibly be next though? How do we fix all these squiggles we’ve just cut into our relief? Easy! A second smoothing session, something we’ll get to in Part IX. Stay tuned!


“Art is not a handicraft, it is the transmission of feeling the artist has experienced.”

- Leo Tolstoy

Share/Bookmark
Related Posts with Thumbnails